"Berbuat BAIK adalah investasi"- "Kesehatan adalah investasi"- "Ilmu adalah investasi"-- "BerInvestasilah yang bisa Menjamin Kebahagian Kehidupan Dunia Akhirat"
Sabtu, 22 Oktober 2022
jadwal tahapan pelaksanaan seleksi penerimaan PPPK
Selasa, 18 Oktober 2022
Senin, 17 Oktober 2022
Instal alat pemantauan jaringan (Zabbix) di Debian 11 Bullseye dengan MySQL/MariaDB & Apache
cara menginstal alat pemantauan jaringan sumber terbuka dan gratis Zabbix di Debian 11 Bullseye Linux menggunakan Apache, MySQL, dan command terminal? Maka inilah tutorial langkah demi langkah untuk diikuti.
Nah, di dunia open-source Nagios mungkin adalah salah satu software monitoring jaringan gratis dan open-source yang paling terkenal. Namun, perlahan selama bertahun-tahun, Zabbix terus mengambil alih pasar dengan menawarkan fitur yang cukup untuk bersaing dengan pemain lain.
Zabbix menawarkan interface web yang diimplementasikan dalam PHP untuk menampilkan semua informasi dan konfigurasi host yang akan dipantau di browser web. Ini menggunakan MySQL, PostgreSQL, Oracle, atau SQLite untuk menyimpan data.
Selain “pemeriksaan sederhana” sederhana untuk memantau service standar seperti SMTP atau HTTP, agen tersedia untuk sejumlah besar sistem operasi termasuk Windows. Dengan bantuan pemantauan itu, server dapat mengumpulkan berbagai macam data untuk ditampilkan secara grafis di interface web Zabbix. Untuk mengingatkan, Zabbix mengirimkan e-mail, SMS, atau pesan instan IM.
Jika Anda baru mengenalnya dan ingin mulai memantau beberapa sistem Anda menggunakan Zabbix + Debian 11 Linux, maka berikut adalah panduan pengaturan awal.
Langkah-langkah untuk menginstal Zabbix Monitor di server Debian 11 Linux
Persyaratan : Apache, MySQL, PHP versi 7.2 atau yang lebih baru, minimum 128 MB RAM (memori fisik) dan 256 MB ruang disk kosong.
1. Perbarui repositori cache Debian 11 APT
Mari kita jalankan perintah pembaruan sistem terlebih dahulu karena itu akan membangun kembali cache repositori APT dan juga membantu sistem kita untuk berada dalam keadaan terbaru.
sudo apt update
2. Instal LAMP- Apache, server MySQL, dan PHP
Karena Zabbix menawarkan interface Web berbasis PHP, maka kita memerlukan server web, bahasa PHP, dan server Database MySQL atau MariaDB untuk menyimpan data di server Debian 11 kita.
Perintah untuk mengatur server web Apache
sudo apt install apache2
Mulai dan aktifkan:
sudo systemctl enable–now Apache2
Untuk memeriksa status service server Web
systemctl status apache2
Perintah untuk menginstal MySQL atau MariaDB
Sekarang sesuai preferensi Anda, instal MySQL atau MariaDB.
#Untuk server Database MariaDB, jalankan:
sudo apt install mariadb-server
Untuk memulai dan mengaktifkan servicenya:
sudo systemctl enable--now mariadb
#Untuk Oracle MySQL 8.0:
Secara default, Oracle MySQL tidak akan tersedia untuk diinstal melalui repositori default Debian 11, oleh karena itu kita harus menambahkan repo resmi terlebih dahulu.
Lihat artikel kita tentang itu – Cara menginstal Server MySQL 8.0 di Debian 11 Bullseye
Setelah Anda selesai dengan instalasi server Database, amankan menggunakan:
mysql_secure_installation
Perintah di atas akan memberikan wizard berbasis teks untuk mengamankan server Database, ikuti saja.
Instal PHP 7.x di Debian 11
Setelah Apache dan MySQL atau MariaDB, instal versi default PHP yang tersedia di Debian 11 yaitu 7.4 beserta ekstensi lainnya.
Salin-tempel perintah yang diberikan dan tekan tombol Enter.
sudo apt install php php-{bz2,mysqli,bcmath,mbstring,ldap,net-socket,pgsql, curl,gd,intl,common,mbstring,xml}3. Tambahkan repositori Zabbix di Debian 11 Linux
Paket yang kita perlukan untuk menginstal Zabbix di Debian 11 Bullseye kita tidak tersedia melalui repositori dasar default. Oleh karena itu, kita perlu menambahkan yang ditawarkan oleh Zabbix untuk sistem berbasis Debian.
Berikut adalah perintah untuk mengaturnya di sistem Linux. Saat melakukan artikel ini, versi terbaru yang tersedia adalah- 5.4.1.
sudo apt install nano wget
wget https://repo.zabbix.com/zabbix/5.4/debian/pool/main/z/zabbix-release/zabbix-release_5.4-1+debian11_all.deb
sudo dpkg -i zabbix-release_5.4-1+debian11_all.deb
Jalankan pembaruan sistem:
Untuk memberi tahu sistem tentang repo terbaru yang ditambahkan, jalankan pembaruan sekali lagi:
sudo apt update
4. Perintah untuk menginstal Zabbix di Debian 11 Bullseye
Terakhir, gunakan manajer paket APT default Debian untuk menginstal paket yang diperlukan yang kita butuhkan termasuk agen:
sudo apt install zabbix-server-mysql zabbix-frontend-php zabbix-apache-conf zabbix-sql-scripts zabbix-agent

5. Buat Database MySQL/MariaDB untuk server Zabbix
Sekarang, semuanya hampir siap, mari buat database untuk dikonfigurasi dengan server Zabbix sehingga data apa pun yang dihasilkannya memiliki tempat untuk disimpan.
Masuk ke MySQL/MariaDB:
sudo mysql
Buat DB:
CREATE DATABASE db_name;
Pengguna basis data dan atur password untuk hal yang sama:
CREATE USER ‘myuser’@’localhost’ IDENTIFIED BY ‘mypass’;
Berikan semua hak database yang dibuat kepada user:
GRANT ALL PRIVILEGES ON `mydb`.* TO ‘myuse’@’localhost’;
FLUSH PRIVILEGES; \q;
Catatan : Ganti mydb, myuser, dan mypass dengan apa pun yang ingin Anda atur.
Catatan : jika Anda telah membuat database tanpa dukungan UTF8 maka Anda akan menghadapi error- ERROR 1071 (42000) pada baris 258: Kunci yang ditentukan terlalu panjang; panjang kunci maksimal adalah 3072 byte
6. Impor skema dan data awal
Skema dan data awal sudah tersedia di folder instalasi Zabbix yang mengonfigurasi bagaimana data harus didefinisikan dalam Database yang dibuat untuknya di MySQL. Makanya, impor saja.
zcat /usr/share/doc/zabbix-sql-scripts/mysql/create.sql.gz | mysql -u myuser p mydb
Ganti myuser dengan user Database Anda dan mydb dengan database yang telah Anda buat untuk Zabbix.
Setelah itu, sistem akan meminta Anda untuk memberikan password user Database yang telah Anda tetapkan saat membuatnya. Oleh karena itu masukkan itu.
Setelah Anda mengikutinya, tunggu beberapa detik untuk membiarkan sistem mengimpor skema dan data.
7. Edit file konfigurasi server Zabbix untuk mengatur detail Database
Sekarang, kita memiliki database yang siap, mari kita atur nama database, user, dan passwordnya di file konfigurasi server Zabbix sehingga dapat digunakan untuk menyimpan data.
sudo nano /etc/zabbix/zabbix_server.conf
Komentari mereka : Temukan dan tambahkan # di depan dua baris:
DBName=zabbix DBUser=zabbix
Dan setelah itu tambahkan detail Database Anda
DBHost = localhost dbname = mydb DBUser = myuser DBPassword = mypass

Gulir ke bawah lebih jauh dan temukan baris- ListenIP= 0.0.0.0 dan hapus # untuk menghapus komentar pada baris ini. Jika tidak, Anda mungkin mendapatkan error:
server zabbix tidak menjalankan informasi yang ditampilkan.
Untuk menyimpan file tekan Crtl+O lalu tekan tombol Enter setelah itu keluar menggunakan Ctrl+X.

8. Mulai ulang server Apache dan Zabbix
Untuk menerapkan perubahan yang dilakukan dalam file konfigurasi, mulai ulang server dan agen.
sudo systemctl restart zabbix-server zabbix-agent Apache2
Setelah itu, aktifkan service server dan agen untuk memulai dengan boot sistem.
sudo systemctl aktifkan zabbix-server zabbix-agent
Untuk menerapkan perubahan yang dilakukan dalam file konfigurasi, mulai ulang server dan agen.
sudo systemctl restart zabbix-server zabbix-agent Apache2
Setelah itu, aktifkan service server dan agen untuk memulai dengan boot sistem.
sudo systemctl aktifkan zabbix-server zabbix-agent
9. Atur frontend Zabbix melalui interface Web
Akhirnya, semuanya selesai, sekarang buka browser web apa pun yang dapat mengakses alamat ip server atau domain tempat Anda menginstal monitor jaringan Zabbix.
Arahkan browser ke server – http://server-ip-address/zabbix atau http://domain-anda/zabbix

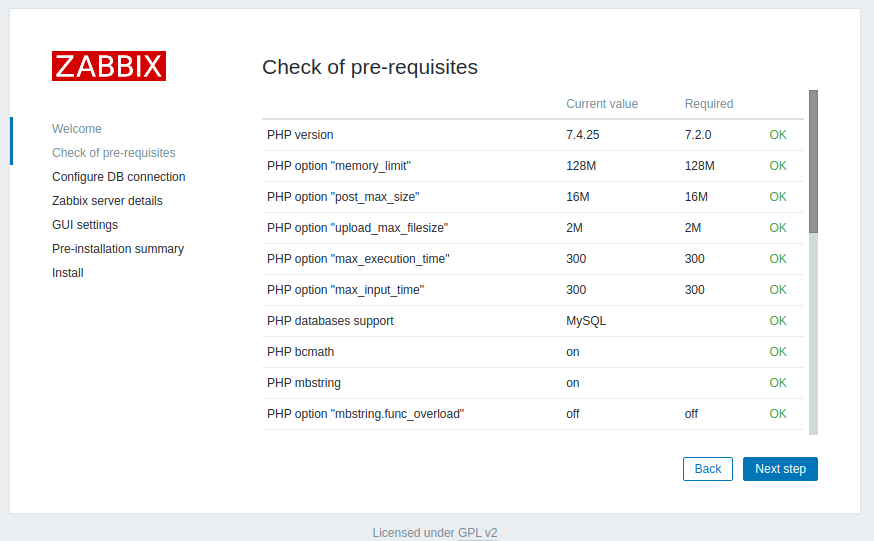
Sistem akan mengkonfirmasi semua persyaratan terpenuhi.

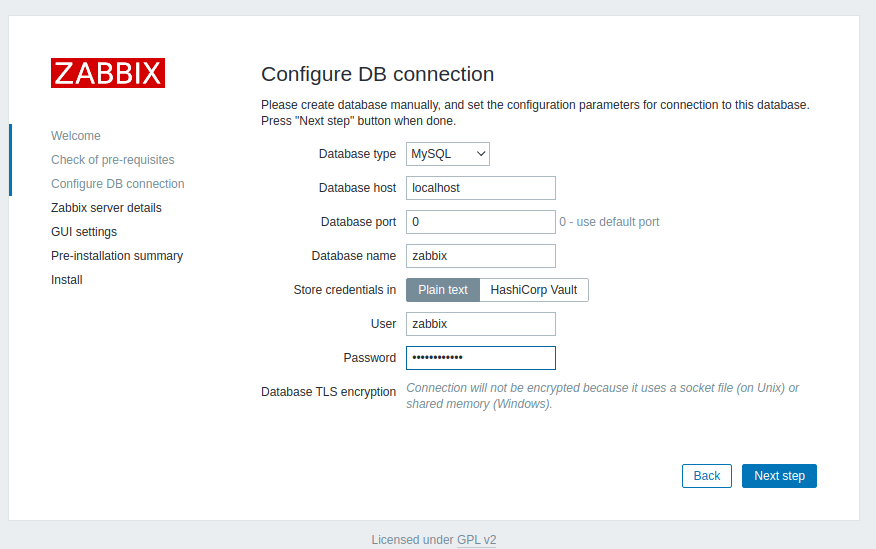
Konfigurasikan DB:
Masukkan detail user dan password Database.

Setelah koneksi Database telah dibuat, hal yang sama akan diinformasikan.

Ubah zona waktu Default dan tema Default, jika Anda ingin membiarkannya apa adanya.

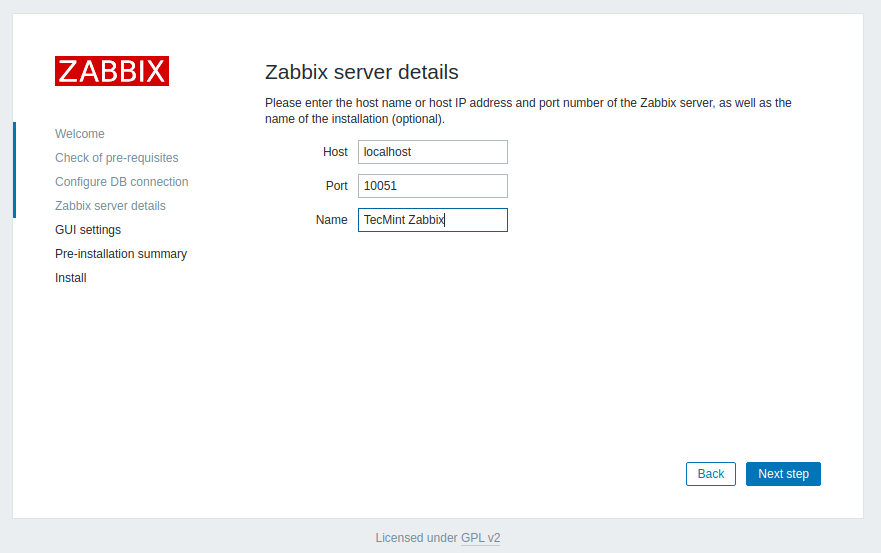
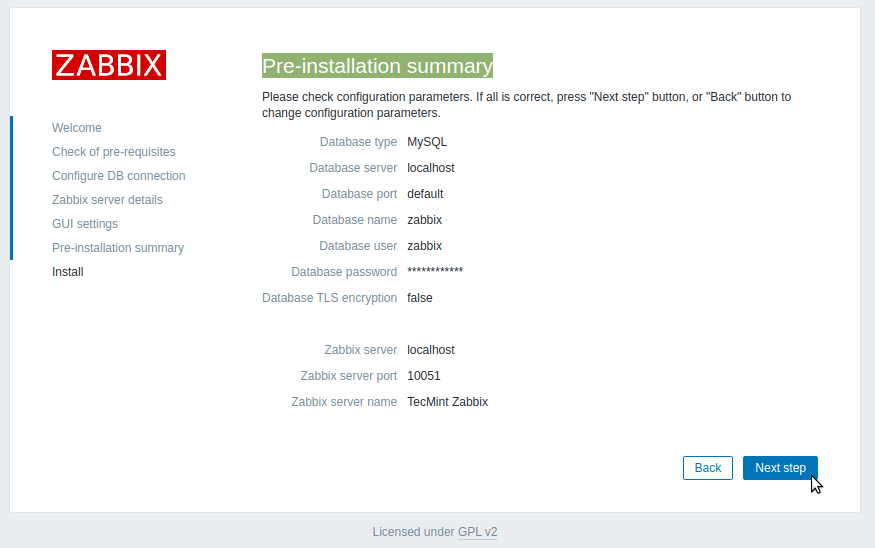
Beri nama server Zabbix Anda dan biarkan host dan port default apa adanya.

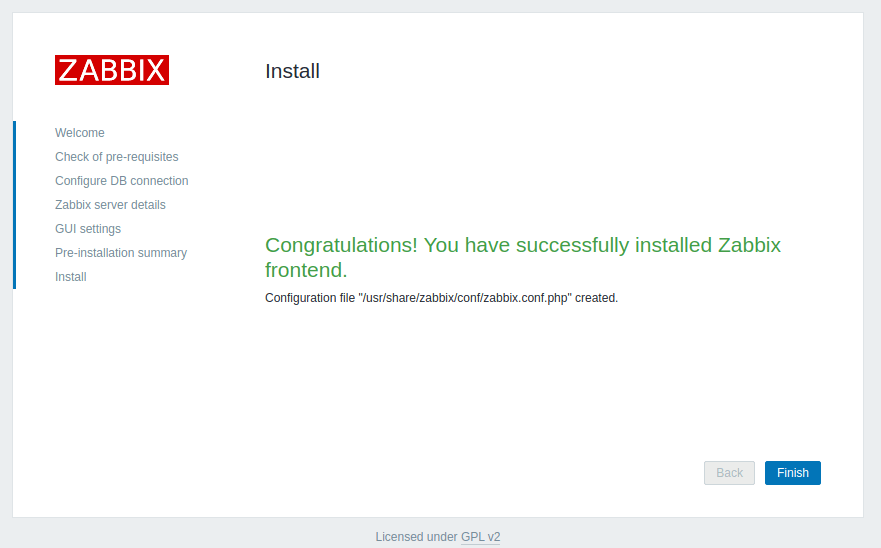
Selamat! Anda telah berhasil menginstal frontend Zabbix.

Akhirnya, semuanya selesai, sekarang buka browser web apa pun yang dapat mengakses alamat ip server atau domain tempat Anda menginstal monitor jaringan Zabbix.
Arahkan browser ke server – http://server-ip-address/zabbix atau http://domain-anda/zabbix

Sistem akan mengkonfirmasi semua persyaratan terpenuhi.

Konfigurasikan DB:
Masukkan detail user dan password Database.

Setelah koneksi Database telah dibuat, hal yang sama akan diinformasikan.

Ubah zona waktu Default dan tema Default, jika Anda ingin membiarkannya apa adanya.

Beri nama server Zabbix Anda dan biarkan host dan port default apa adanya.

Selamat! Anda telah berhasil menginstal frontend Zabbix.

10. Nama user dan detail login default- Zabbix
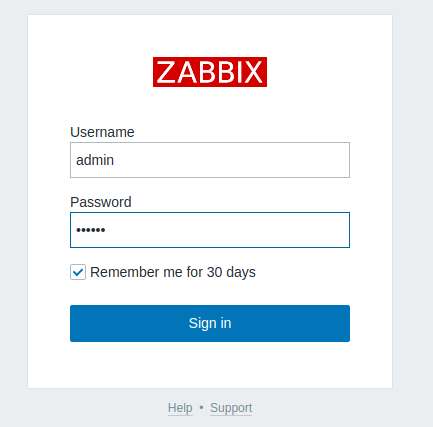
Pada layar login, masukkan nama user- Admin dan password- zabbix. Setelah masuk, ubah password user Admin. Untuk lebih jelasnya, lihat dokumentasi resmi.

Pada layar login, masukkan nama user- Admin dan password- zabbix. Setelah masuk, ubah password user Admin. Untuk lebih jelasnya, lihat dokumentasi resmi.

11. Dasbor

Author: fungsi

install zabix versi 2
Step 1: Installing Apache Web Server and PHP Packages
1. To install Zabbix, first, you need to install Apache and PHP along with some required PHP modules as follows.
# apt install apache2 php php-mysql php-mysqlnd php-ldap php-bcmath php-mbstring php-gd php-pdo php-xml libapache2-mod-php
2. In the installation process, the installer triggers the systemd to automatically start Apache service, and it also enables it to automatically start at system boot. You can check if it is up and running using the systemctl command.
# systemctl status apache2
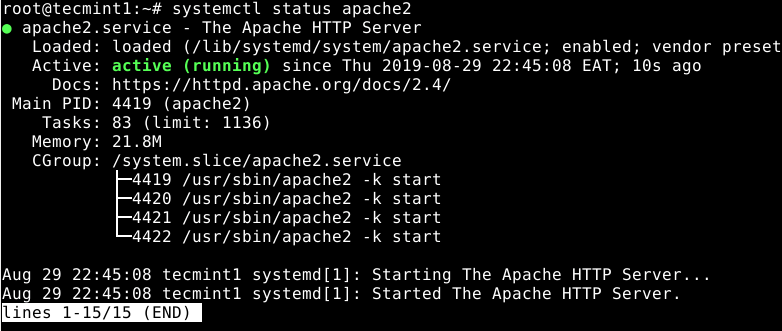
The following are some useful systemctl commands for managing the Apache services under systemd.
# systemctl start apache2
# systemctl stop apache2
# systemctl restart apache2
Step 2: Install MariaDB Server and Client
3. To store data, Zabbix requires a database management system. It supports MySQL by default but for this guide, we will install MariaDB as a drop-in replacement for MySQL.
# apt install mariadb-server mariadb-client
4. When the installation is complete, the MariaDB service is auto-started and enabled to automatically start at system startup. To check if it is up and running, use the following command.
# systemctl status mariadb
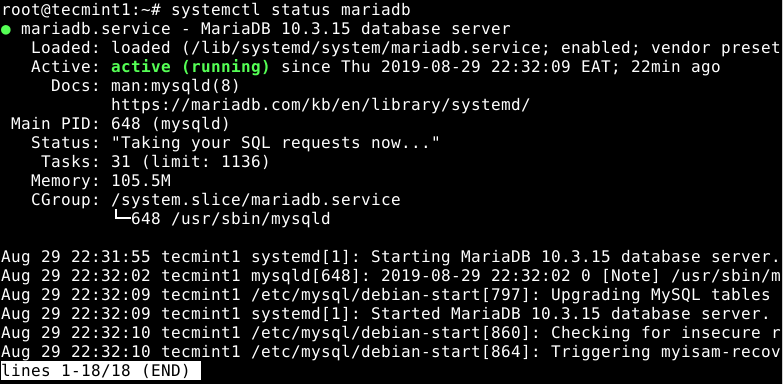
5. Next, you need to secure your MariaDB server database installation. The installed package ships with a script that you need to run and follow the security recommendations.
# mysql_secure_installation
It will ask you to determine actions to remove anonymous users, disable root login remotely, remove test database and access to it, and apply all changes.
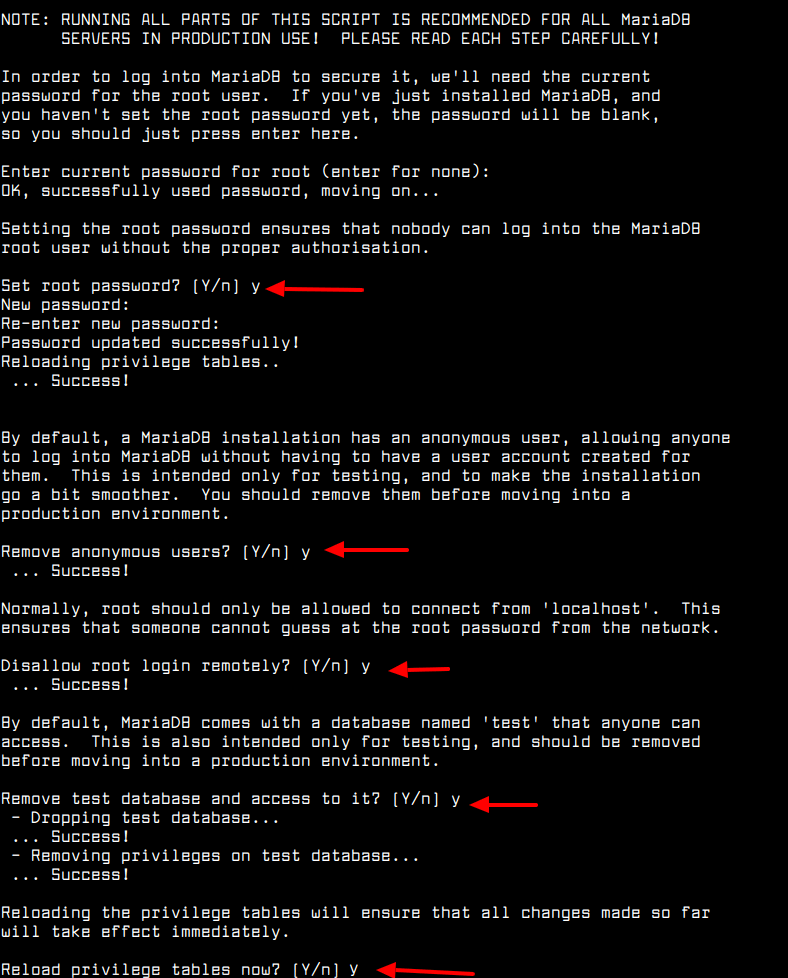
6. Once the database server is secured, you need to create a database for Zabbix. First, log in to the database to gain access to the MariaDB shell as follows.
# mysql -u root -p
7. Then issues the following SQL commands to create the required database (do not forget to set a secure password).
MariaDB [(none)]> create database zabbix character set utf8 collate utf8_bin;
MariaDB [(none)]> grant all privileges on zabbix.* to zabbix@localhost identified by 'admin@monit1';
MariaDB [(none)]> quit;
Step 3: Installing and Configuring Zabbix Server
8. To install Zabbix, you need to enable the Zabbix Official Repository which contains the Zabbix packages, as follows.
# wget --no-check-certificate https://repo.zabbix.com/zabbix/5.4/debian/pool/main/z/zabbix-release/zabbix-release_5.4-1+debian11_all.deb
# dpkg -i zabbix-release_5.4-1+debian11_all.deb
# apt update
9. Now install the Zabbix server, web frontend, agent packages using the following command.
# apt install zabbix-server-mysql zabbix-frontend-php zabbix-apache-conf zabbix-sql-scripts zabbix-agent
10. If the package installation is successful, next, import the initial schema and data into the Zabbix database which you created in the previous step.
# zcat /usr/share/doc/zabbix-sql-scripts/mysql/create.sql.gz | mysql -uzabbix -p zabbix
11. Next, configure the Zabbix server daemon to use the database you created for it by editing the file /etc/zabbix/zabbix_server.conf.
# vim /etc/zabbix/zabbix_server.conf
Look for the following configuration options and update their values to reflect your database settings. Note that you need to uncomment any option(s) that are commented out and set their correct values.
DBHost=localhost
DBName=zabbix
DBUser=zabbix
DBPassword=admin@monit1
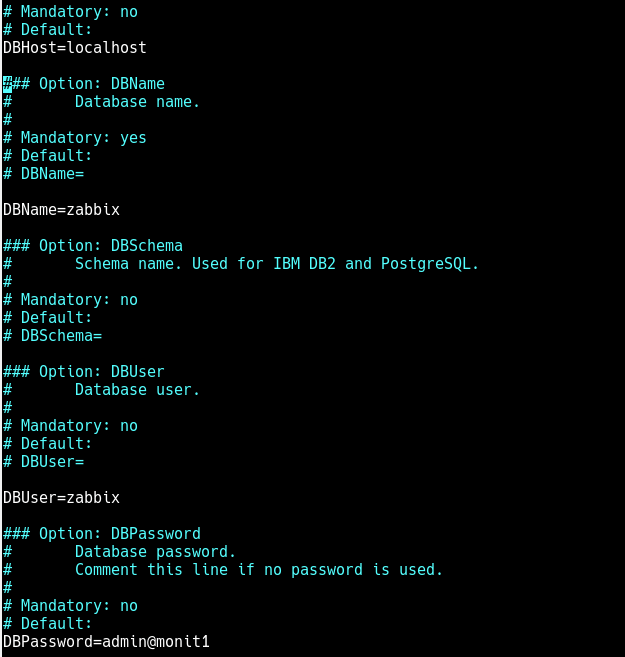
Then save the new changes in the file and exit it.
12. You should also set up PHP to work correctly with the Zabbix frontend by defining your timezone in the /etc/zabbix/apache.conf file.
# vim /etc/zabbix/apache.conf
Find the configuration section for your PHP version, for example, PHP 7.x. Then uncomment the following line (by removing the “#” character at the start) to enable timezone for your server as shown in the screenshot.
php_value date.timezone Africa/Kampala
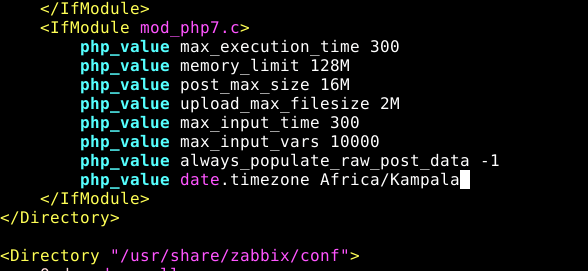
Save the changes and close the file.
13. Now restart the Apache server to apply recent changes.
# systemctl restart apache2
14. With all the perfect environment setup, you can now start the Zabbix server and agent processes, enabling them to auto-start at system boot as shown.
# systemctl start zabbix-server zabbix-agent
# systemctl enable zabbix-server zabbix-agent

15. Then make sure to check the status of the Zabbix server using the following command.
# systemctl status zabbix-server
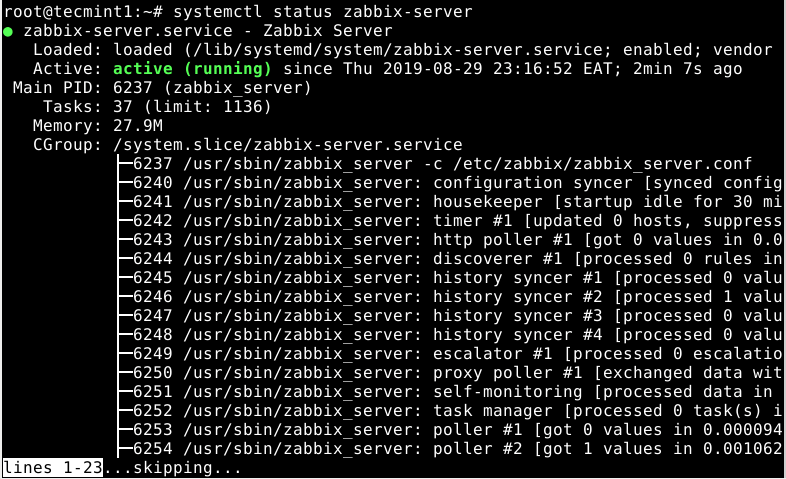
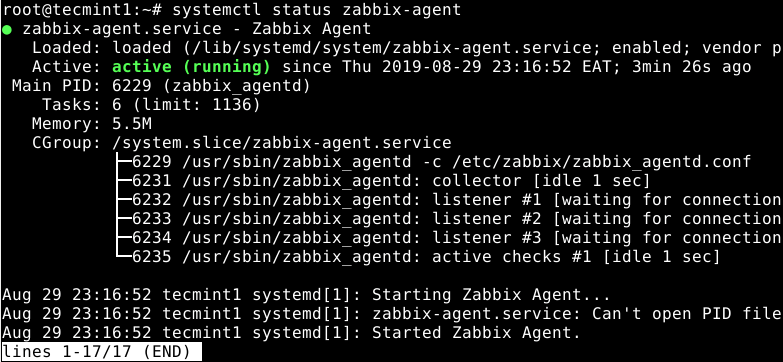
16. Also, ensure that the Zabbix agent process is up and running by checking its status as shown. Remember the agent you have started is running on and monitoring the local host. If you want to monitor remote servers, install and configure agents on them (refer to related articles at the end of the guide).
# systemctl status zabbix-agent
17. Before you can access the Zabbix web frontend as shown in the next section if you have the UFW firewall service running, you need to open port 80(HTTP) and 443(HTTPS) to allow traffic to the Apache server.
# ufw allow 80/tcp
# ufw allow 443/tcp
# ufw reload
Step 4: Installing and Configuring Zabbix Web Frontend Interface
18. Before you can start using the Zabbix web frontend for monitoring, you need to configure and set it up via a web installer. To access the installer, open a web browser and point it to the following URL.
http://SERVER_FQDM/zabbix
OR
http://SERVER_IP/zabbix
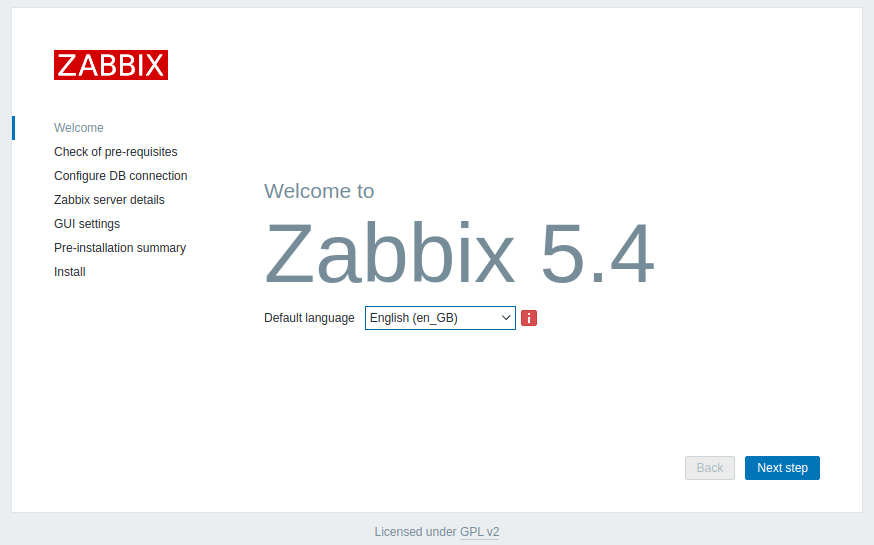
19. Once you click go, or press Enter, you will land on the Welcome page as shown in the following screenshot. Click Next step to start the setup process.
20. The installer will then check the pre-requisites as shown in the screenshot, if all required PHP modules and configuration options are OK (scroll down to view more requirements), click Next step to proceed.
21. Next, enter the database connection settings for the Zabbix frontend to link to the database. Choose the database type (which should be MySQL), provide the database host, database port, database name, and database user, and the user’s password as shown in the screenshot.
22. Next, enter the Zabbix server details (hostname or host IP address and port number of the hosting server). Optionally, set a name for the installation.
23. Now the installer should show you the pre-installation summary page. If all is fine, click Next step to complete the setup.
24. Now click Finish, and you should be re-directed to the login page as shown in the next screenshot.
25. To login, enter the username Admin and password zabbix.
26. Once you have logged on, you will see the Monitoring section Dashboard. The Global view will display a sample of System information, problems by severity, problems, local time, and more, as shown in the screenshot.

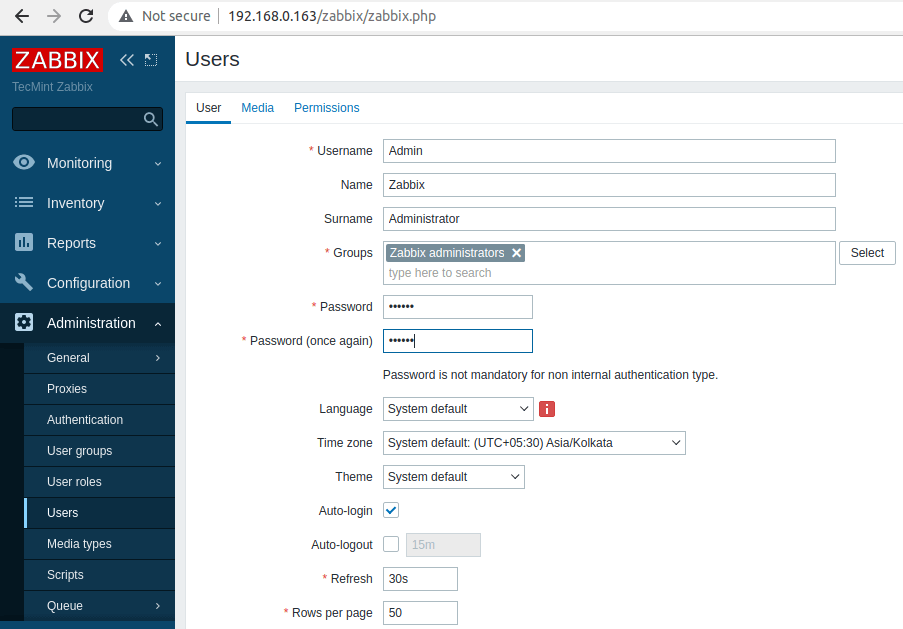
27. As an important step, you need to change the default administrator account password. To do that, go to Administration ==> Users.
From the list of users, under Alias, click on Admin to open the user’s details. In the user details page, look for the Password field and click Change password. Then set a secure password and confirm it. And click Update to save the password.
