I-MSCP
1.Pengertian I-MSCP
2.Fitur-Fitur I-MSCP
- Custom DNS records
- Event Manager (frontEnd and Backend)
- External Mail Server
- Mail Server management (postfix,courier,Dovecot)
- Multi-user level web interface(administrator,reseller,and client)
- MySQL/MariaDB support
- PHP setting Editor (satu user, satu domain atau satu situs)
- Plugin API (frontEnd and backend)
- Presseding feature untuk installasi tanpa pengawasan
- Remote SQL server support
- Software package installer
- SQL server management (MySQL)
- Web folder protection menggunakan FS immutable bit.
- Web server management (Apache2 ITK,fegid and fastCGI/PHP5-FPM)
3.Minimum Requirement I-MSCP
- RAM minimum 512 MB
- Prosesor 2 GHz ataulabihcepat/ 32-bit (x86) atau 64-bit (x64),atau lebih dianjurkan menggunakan corei3
- Hard drive minimal 1 GB
- Akses internet minimum 100 Mbits/s
- Aplikasi PHP harusdiatasversi 5.3.2 danperlharusaiatasversi 5.10.1
- Linux OS untuk debian minimal Squeeze dan Ubuntu minimal Lucid
4.Plugin I-MSCP
- Development : RemoteBridge dan DebugBar
- Miscellaneous : InstantSSH, RouncubePlugin, OwnDDNS, Domain AutoApproval,Demo
- Billing : KaziWhmcs dan ImscpBoxBilling
- Statistic : Monitorix dan Mailgraph
- Hook-Files : Apache2 Tool Redirec, Postfix Smarthost, Bind9 Localnets
- Other : AdminerSQL, InstantSSH, PhpSwitcher, PostScreen, SpamAssassin, OpenDKIM, ClamAV
5.Instalasi I-MSCP di Debian
- Masukan perintah nano /etc/apt/sources.list untuk menambahkan domain.
- Setelah masuk ke halaman dari perintah tadi, scroll dan tambahkan domain berikut :
- Tuliskan perintah apt-get install lalu ketik apt-get update &&apt-get dist-upgrade dan tunggu proses instalasi selesai.
- Kemudian akan ada pertanyaan do you want to continue? ketik Y & enter. Setelah itu Anda akan diminta untuk memasukkan DVD debian dan akan terjadi proses instalasi tunggu hingga selesai.
- Setelah itu akan muncul tampilan berikut pilih Ok. Kemudian akan terjadi proses instalasi kembali tunggu hingga selesai.
- Selanjutnya ketik perintah cd /opt kemudian ketik perintah wget https://github.com/i-mscp/imscp/archive/1.5.3-2018120800.tar.gz dan kembali akan melakukan proses instalasi tunggu hingga selesai.
- Masukan perintah ls dan tar -xzvf 1.5.3-2018120800.tar.gz lalu enter. Tunggu proses instalasi selesai.
- Lalu masuk ke direktori imscp ketik perintah cd imscp-1.5.3-2018120800 selanjutnya ketik perintah ./imscp-autoinstall -dc dan tunggu proses instalasi selesai.
- Pada kolom Please enter a username for the master administrator perlu diperhatikan karena ini adalah id dan password yang digunakan nanti untuk login pada portal imscp.
- Pada tampilan Please enter a domain name for the control panel juga harus teliti karena ini akan digunakan untuk mengakses lama imscp pada browser.
- Jika sudah sampai pada tahap instalasi seperti tampilan berikut ini adalah proses intalasi terakhir yang cukup banyak memakan waktu tunggu hingga proses selesai.
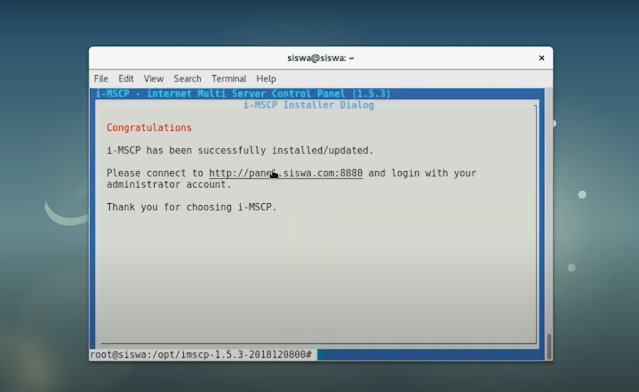
- Jika proses instalasi sudah selesai akan muncul tampilan seperti berikut yang menandakan bahwa proses keseluruhan sudah berhasil.
i-MSCP 1.5.3 installation on Debian
Supported Debian versions
- Debian Jessie (8.x),
- Debian Stretch (9.x)
- Debian Buster (10.x)
Installation
1. Make sure that your distribution is up-to-date
apt-get update
apt-get --assume-yes --auto-remove --no-install-recommends dist-upgrade
2. Install the pre-required packages
apt-get -y --auto-remove --no-install-recommends install ca-certificates perl \
whiptail wget
3. Download and un-tar the distribution files
cd /usr/local/src
wget https://github.com/i-MSCP/imscp/archive/<release_tag>.tar.gz
tar -xzf imscp-<release_tag>.tar.gz
4. Change to the newly created directory
cd imscp-<release_tag>
5. Install i-MSCP by running its installer
perl imscp-autoinstall -d
Note that by default, not all setup dialogs are displayed, that is, those for which a default value is available. If you want force the installer to display all setup dialogs, you need to pass the --reconfigure option, without any argument, to the installer.
You can have a look at the preseeding template file to know the default values used by the installer.
i-MSCP Upgrade
1. Make sure to read the errata file
Before upgrading, you must not forget to read the errata file
2. Make sure to make a backup of your data
Before any upgrade attempt it is highly recommended to make a backup of the following directories:
/var/www/virtual
/var/mail/virtual
These directories hold the data of your customers and it is really important to backup them for an easy recovering in case something goes wrong during upgrade.
3. Make sure that your distribution is up-to-date
apt-get update
apt-get --assume-yes --auto-remove --no-install-recommends dist-upgrade
4. Download and un-tar the distribution files
cd /usr/local/src
wget https://github.com/i-MSCP/imscp/archive/<release_tag>.tar.gz
tar -xzf imscp-<release_tag>.tar.gz
5. Change to the newly created directory
cd imscp-<release_tag>
6. Update i-MSCP by running its installer
perl imscp-autoinstall -d


